Build Kubernetes HA Cluster by Kubic
总的指导文章:https://kubernetes.io/docs/setup/independent/ha-topology/
Kubic 现在已经被 SUSE 废弃,可惜了。
创建虚拟机
想试下 terraform + kvm 来搭建,感觉手工用 cloud-init 还是太慢。使用 https://github.com/dmacvicar/terraform-provider-libvirt terraform-provider-libvirt-Fedora-28,binary 现在区分 provider OS 下载。还是有点懒,https://github.com/kubic-project/automation/tree/master/kubic-kvm 这个有,为什么要自己创建呢?代码里面的地址有点老,改成 https://download.opensuse.org/repositories/devel:/kubic:/images/openSUSE_Tumbleweed/ 这个下面的。国内镜像 http://mirrors.ustc.edu.cn/opensuse/tumbleweed/appliances/。我用的是 openSUSE-Tumbleweed-Kubic.x86_64-15.0-kubeadm-cri-o-OpenStack-Cloud-Build4.5.qcow2。另外一个 https://github.com/kubic-project/automation/tree/master/caasp-kvm 可以创建多 master,但是要企业账号。运行完后会显示 3 个 vm 的地址:
ips = [
    [192.168.122.122], [192.168.122.174], [192.168.122.244]
]
现在上面 repo 都已经消失,改成 https://github.com/kubic-project/kubic-terraform-kvm。现在这个也archive了,这是闹哪样。
如果要查询已生成虚机 IP,使用 terraform show 命令。我没有用 micro-os,改成 kubic-kubeadm,这个 vm 起来后啥都没有,只是 image 预先包含了 kubeadm/kubelet 包,容器引擎用的是 cri-o。集群还要自己初始化:
kubeadm init --cri-socket="/var/run/crio/crio.sock" --pod-network-cidr=10.244.0.0/16
mkdir -p ~/.kube, then cp -i /etc/kubernetes/admin.conf ~/.kube/config
只需这个命令就可以,不需要 kubeadm 配置文档里面的七七八八的东西,还是比自己用 kubeadm 从头搭建方便些。CNI 我用的是推荐的 flannel。 .tf 文件使用了 template plugin,这样可以方便的创建多个 vm。创建后,我使用 pci-passthough SR-IOV 网卡,这样能直接访问节点。暂时手工在 virt-manager里面修改,terraform-provider-libvirt 还没法控制 SR-IOV 设备。
HA - External etcd topology
好,现在创建了 6 个节点,3 + 3,开始安装 HA https://kubernetes.io/docs/setup/independent/high-availability/
使用 External etcd nodes 模式。这篇文章写的质量比较差,难以看懂。用到了ssh-agent:『它是linux 系统上的一个程序,这个程序可以控制和保存公钥身份验证所使用的私钥程序,当 ssh-add 把私钥交给 ssh-agent 来管理时,其他程序需要身份验证的时候都可以申请交给 ssh-agent 来完成整个认证过程.所以,到这里我们应该大体了解 ssh-agent : 它就是一个帮助我们验证身份的程序.』
和 ssh-copy-id 或者 ssh -i id_rsa 这种免密登录不一样么?
 我的 external etcd cluster 使用的是用 etcd operator 已经创建的好的集群,和上面图有些不同,我画了一张。
etcd operator
用 external etcd mode,需要三个证书来访问 etcd,etcd operator 配置文档,有点麻烦,不好搞。准备转为 stack 模式前,看了下其源代码里面的 example/tls/example-tls-cluster.yaml,居然有这么好的例子, 可以直接用。创建 CRD 前要先执行命令 kubectl create secret(无法放到 yaml 里面?)。访问的时候必须用 DNS hostname。先设置 service 为 NodePort,这时候打开 https://192.168.51.11:30373/,浏览器报错 NET::ERR_CERT_AUTHORITY_INVALID,合理。上面文档说『To access the cluster, use the service example-client.default.svc, which matches the SAN of its certificates.』,我看证书生成过程中也指名了 host,这个是证书的必填项,不能为*(dashboard自己生成证书似乎可以匹配任何host),于是在 OpenWrt /etc/dnsmasq.conf 中添加:
address=/.example.default.svc/192.168.51.11
address=/example-client.default.svc/192.168.51.11
etcdctl 测试通过。需要的三个文件为 etcd-client.crt,etcd-client.key,etcd-client-ca.crt。crt 和 key 为证书和私钥,因为是我们自己生成的证书,所以要有个假的 CA 来证明证书是合法的。最后使用下面命令测试下:
ETCDCTL_API=3 etcdctl --endpoints=https://example-client.default.svc:30373  --cert=etcd-client.crt --key=etcd-client.key --cacert=etcd-client-ca.crt member list -w table
ETCDCTL_API=3 etcdctl --endpoints=https://example-client.default.svc:30373  --cert=certs/etcd-client.crt --key=certs/etcd-client.key --cacert=certs/etcd-client-ca.crt get '' --prefix=true
ETCDCTL_API=3 etcdctl --endpoints=https://example-client.default.svc:30373 --cert=certs/etcd-client.crt --key=certs/etcd-client.key --cacert=certs/etcd-client-ca.crt del '' --prefix
etcdctl -w table endpoint status
配置 api server LB,使用 HAProxy
listen  https_web 192.168.51.230:6443
        mode tcp
        balance roundrobin # Load Balancing algorithm
        #kubic-0,1,2
        server server1 192.168.51.141:6443 weight 1 maxconn 512 check
        server server1 192.168.51.120:6443 weight 1 maxconn 512 check
        server server1 192.168.51.123:6443 weight 1 maxconn 512 check
check 表示健康检查,这样就没有必要使用 Keepalived 了。然后再 OpenWrt 里面配置 k8s.api.server DNS IP 为上面的 192.168.51.230,因为要有证书(下面会生成)访问。上面配置我可以改为使用 hostname,比如 kubic-1,重建后 Hostname 对应的 IP 会变,但是 HAProxy 照样能工作。可以的。这里通过 6443 端口能否访问来判断 api server 是否运行,并没有通过检查响应内容来判断服务是否正常。
有一次,kubic-0 上面的api-server pod停止运行,dashboard页面打不开,但是其错误现实似乎是个内部ip的地址。
Get https://10.96.0.1:443/apis/rbac.authorization.k8s.io/v1/roles: dial tcp 10.96.0.1:443: connect: connection refused
停掉 api server pod: crictl stopp 1a84106e28fb3,pod 马上变为 running,原来这个 pod 也和普通一样会自动重启,看来要停掉 kube-0 才能测试了。先找到方法监控 haproxy,本身就有带:
listen stats
    bind :32700
    stats enable
    stats uri /
    stats hide-version
这样就可以看到详细的统计信息,不错!现在停掉 kubic-0(libvirt pause),haproxy stats 马上就可以看到效果:
 因为是 master 节点,所以并没有发生pod迁移。dashboard 用 kubic-1:nodeport 可以继续访问。HAProxy 新版本已经支持prometheus,指标还是这些,但是就能够时间序列数据了。
HA k8s nodes (control and worker)
继续 k8s HA 部署。最终的 kubeadm-config.yaml 为:
apiVersion: kubeadm.k8s.io/v1beta1
kind: ClusterConfiguration
kubernetesVersion: stable
apiServer:
  certSANs:
  - "k8s.api.server"
    controlPlaneEndpoint: "k8s.api.server:6443"
    networking:
    podSubnet: 10.244.0.0/16
    etcd:
    external:
      endpoints:
      - https://example-client.default.svc:30373
        caFile: /etc/kubernetes/pki/etcd/ca.crt
        certFile: /etc/kubernetes/pki/apiserver-etcd-client.crt
        keyFile: /etc/kubernetes/pki/apiserver-etcd-client.key
上面 api server 要设置 DNS,etcd endports 我这里是 etcd in k8s cluster 的 server 地址,单个节点似乎没法在 k8s 外部单独访问。拷贝证书后,运行 kubeadm init --config kubeadm-config.yaml --cri-socket="/var/run/crio/crio.sock",错误:
[ERROR ExternalEtcdVersion]: this version of kubeadm only supports external etcd version >= 3.2.18. Current version: 3.2.13
看来可以连接我的 etcd cluster within k8s 了,修改 etcd CRD 的版本,看看 operator 能否自动更新。可以,不错。但是创建出来的 pod 在 dashboard 显示为 58 分钟前,应该为刚刚创建才对。api server 有日志:
[certs] apiserver serving cert is signed for DNS names [kubic-0 kubernetes kubernetes.default kubernetes.default.svc kubernetes.default.svc.cluster.local k8s.api.server k8s.api.server] and IPs [10.96.0.1 192.168.51.156]
这个是 kubeadm 自动创建 api server 的 load balance 证书。从上面看证书不仅可以绑定域名,也可以绑定 IP,当然还是 DNS 域名更灵活。
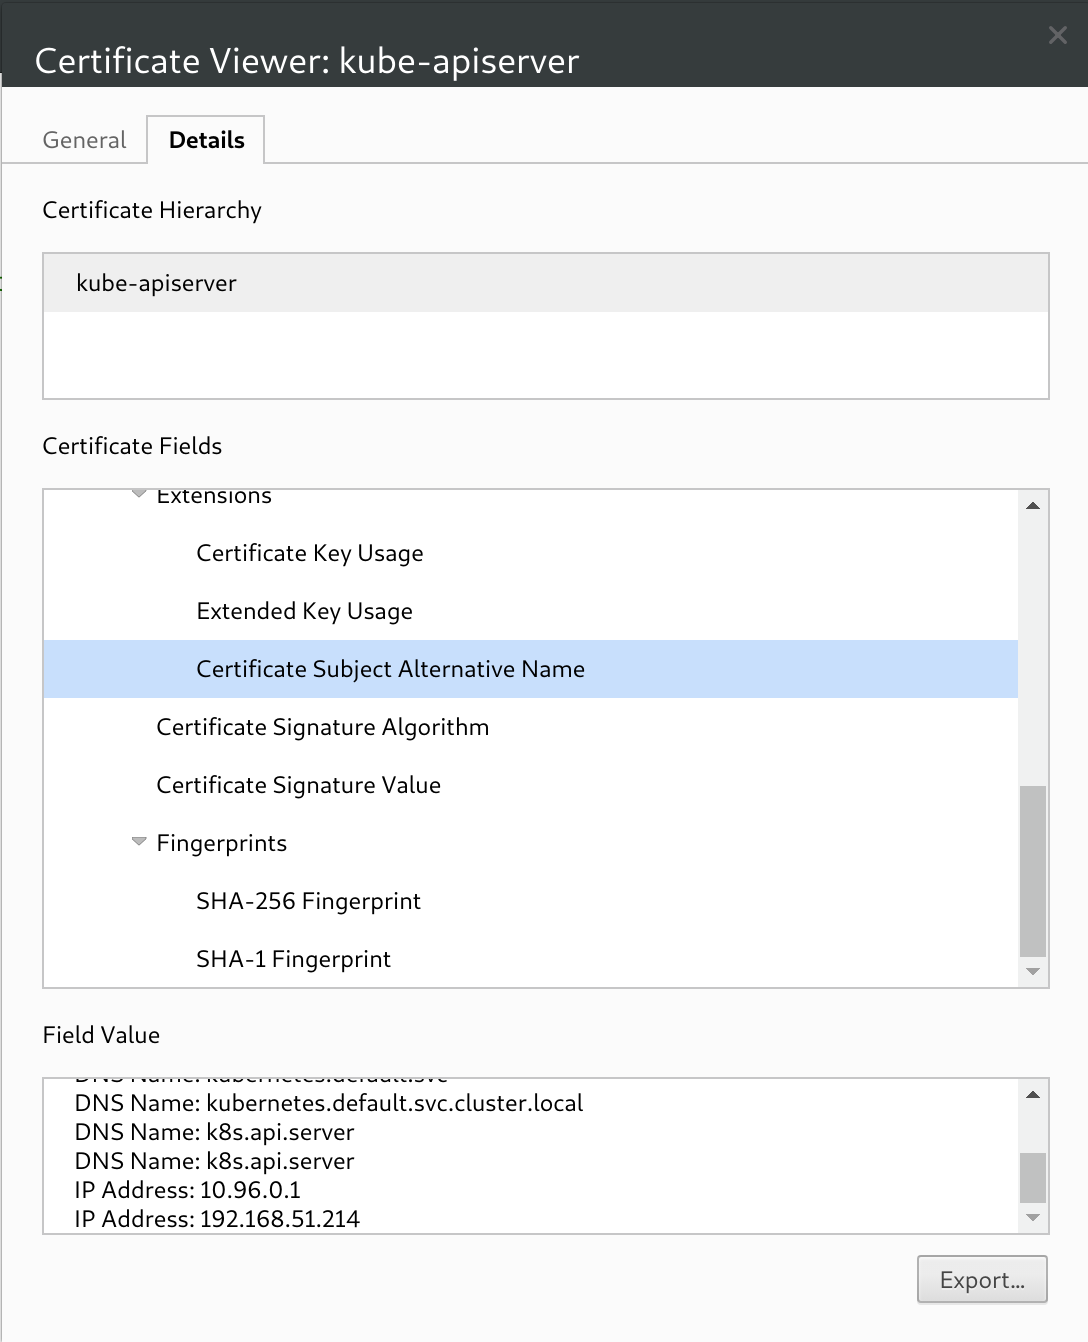 生成证书的比 dashboard 的更为严格。
然后出现错误:Unfortunately, an error has occurred: timed out waiting for the condition。
生成证书的比 dashboard 的更为严格。
然后出现错误:Unfortunately, an error has occurred: timed out waiting for the condition。journalctl -xeu kubelet 里面有错误说无法访问 https://k8s.api.server:443。我 haproxy 里面配置的是 443 端口,改为6443,这个为 api server 的默认端口。重新部署,先要
crictl stop 2c8a3864d03a0 e628c4b5031ae(pod id)
删除老的 pod,否则报错说端口占用,这似乎为 kubeadm reset 的 bug:没有考虑到 cri-o(后来发现原来 reset 的时候也要加上参数 –cri-socket:kubeadm reset –cri-socket=”/var/run/crio/crio.sock”,这样就不用手工停止容器)。
现在很快就可以看到 join 命令:
kubeadm join k8s.api.server:6443 --token ex0wd0.3ds30ke6hx2xal8k --discovery-token-ca-cert-hash sha256:12c505a79febe74a4a3255750b25b9c7a4e6556cb65bdb80f737d1092051b69c
For master node, should add additional parameters: --experimental-control-plane --cri-socket="/var/run/crio/crio.sock". For work node, just need --cri-socket.
然后把 kubic-1加入到 master 中,我把公钥拷贝到 kubic-0 上面,这样就能免密登录其他机器。可能这种和 ssh-agent 效果差不多。这个时候发现 kubic-0上面的 api server 反复重启。crictl logs 显示:
Unable to create storage backend: config (&{ /registry [https://example-client.default.svc:30373] /etc/kubernetes/pki/apiserver-etcd-client.key /etc/kubernetes/pki/apiserver-etcd-client.crt /etc/kubernetes/pki/etcd/ca.crt true 0xc0005ba1b0 <nil> 5m0s 1m0s}), err (dial tcp 192.168.51.11:30373: connect: no route to host)
一会又好了。现在 attempt 8 次,后来反复创建都没有出现这个问题,这个可能是网络延迟。经过一段时间测试,虽然 kubectl 命令有些慢,这种 external etcd 的模式基本没有问题。考虑到这个 etcd 集群是由 etcd operator 创建出来的容器,性能会有些差,但还是可以用的。etcd operator 默认创建出来的容器的文件系统可能是普通文件镜像,没有保存到磁盘。文档中的:
scp /etc/kubernetes/pki/etcd/ca.crt "${USER}"@$host:etcd-ca.crt
scp /etc/kubernetes/pki/etcd/ca.key "${USER}"@$host:etcd-ca.key
我只有 ca.crt 文件,看看原来部署的集群,也是只有一个文件,只拷贝第一个,似乎也没问题。但是 api server boot error:
Unable to create storage backend: config (&{ /registry [https://example-client.default.svc:30373] /etc/kubernetes/pki/apiserver-etcd-client.key /etc/kubernetes/pki/apiserver-etcd-client.crt /etc/kubernetes/pki/etcd/ca.crt true 0xc00090a240 <nil> 5m0s 1m0s}), err (open /etc/kubernetes/pki/apiserver-etcd-client.crt: no such file or directory)
缺文件,于是拷贝 apiserver-etcd-client.crt & apiserver-etcd-client.key,下载问题好了,Node 也 ready,but now find coredns pod is still in ContainerCreating status, run kubectl describe on it: failed to find plugin “weave-net” in path [/usr/lib/cni /opt/weave-net/bin]. I have ever encountered this issue in KubeVirt / Kata Containers. Fix it by modify cri-o conf file. Then another error: failed to find plugin “loopback” in path [/opt/cni/bin /opt/loopback/bin]. OK. Copy weave plugin to /usr/lib/cni.
kubic-0:/usr/lib/cni # cp -r /opt/cni/bin/weave-plugin-2.5.1 ./
cp: cannot create regular file './weave-plugin-2.5.1': readonly filesystem
WTF. So the OpenSuse release should be like Fedora Atomic/CoreOS(Transactional Updates). It is too later to change weave to another CNI like flannel because I didn’t add CIDR parameter. The dir /usr/lib/cni has this cni. So the kubic image didn’t add other cni by default? No other way. Switch to flannel. But the pod can’t start:
Failed to create SubnetManager: error retrieving pod spec for 'kube-system/kube-flannel-ds-amd64-5nklv': Get https://10.96.0.1:443/api/v1/namespaces/kube-system/pods/kube-flannel-ds-amd64-5nklv: dial tcp 10.96.0.1:443: i/o timeout
Try serveal times and still get same error. Why? etcd or iptables or ipvs cache? Or my CIDR setting issue(controller manager log report this)? Switch back to weave, same issue. WTF. Destroy all nodes and re-create again. This time when just run kubeadm init and the weave pod is already there! I didn’t install weave yet! Indeed, kubeadm reset will not clean external etcd. To wipe it, run etcdctl del "" --prefix. Be careful to run this command, for this will make a running cluster broken immediately! This should be root cause. Try again and use flannel as CNI. Works well. So make sure everything in first node works well and then add another node to control panel.
Then add work node. It is quite simple as deploy non HA cluster. Not need copy cert file.
Kubic
It is based on openSuse MicroOS. + kubeadm. Use btrfs file system. https://kubic.opensuse.org/blog/2019-01-22-certified/. Use Open Build Service to build so many different image. Use CRI-O container engine. MicroOS based on openSUSE Tumbleweed。 Tumbleweed 项目是一个“滚动升级”的 openSUSE 版本,俗称“风滚草”。滚动升级的版本不像 openSUSE 的常规版本(Leap) 那样受限于版本开发周期,可以始终使用最新稳定版本的全部软件。该项目适合想使用最新的、稳定的软件的 openSUSE 用户。 https://en.opensuse.org/Kubic:MicroOS Read-only root filesystem. But why can write file to /etc/kubernetes & /root directory? /etc/fstab:
LABEL=ROOT    /.snapshots             btrfs    defaults,subvol=@/.snapshots                0  0
LABEL=ROOT    /home                   btrfs    defaults,subvol=@/home                      0  0
LABEL=ROOT    /opt                    btrfs    defaults,subvol=@/opt                       0  0
LABEL=ROOT    /root                   btrfs    defaults,subvol=@/root                      0  0
LABEL=ROOT    /srv                    btrfs    defaults,subvol=@/srv                       0  0
LABEL=ROOT    /tmp                    btrfs    defaults,subvol=@/tmp                       0  0
LABEL=ROOT    /var                    btrfs    defaults,subvol=@/var,x-initrd.mount        0  0
LABEL=ROOT    /usr/local              btrfs    defaults,subvol=@/usr/local                 0  0
LABEL=ROOT    /boot/grub2/i386-pc     btrfs    defaults,subvol=@/boot/grub2/i386-pc        0  0
LABEL=ROOT    /boot/grub2/x86_64-efi  btrfs    defaults,subvol=@/boot/grub2/x86_64-efi     0  0
LABEL=ROOT    /                       btrfs    ro                                          0  0
LABEL=EFI     /boot/efi               vfat     defaults                                    0  0
LABEL=docker  /var/lib/docker         btrfs    defaults                                    0  0
overlay       /etc                    overlay  defaults,lowerdir=/sysroot/var/lib/overlay/3/etc:/sysroot/var/lib/overlay/2/etc:/sysroot/var/lib/overlay/etc:/sysroot/etc,upperdir=/sysroot/var/lib/overlay/4/etc,workdir=/sysroot/var/lib/overlay/work-etc,x-systemd.requires-mounts-for=/var,x-systemd.requires-mounts-for=/var/lib/overlay,x-systemd.requires-mounts-for=/sysroot/var,x-systemd.requires-mounts-for=/sysroot/var/lib/overlay,x-initrd.mount  0  0
/etc is an overlay file system. Is there way to rollback all of my modification?
btrfs subvolume list / will list lots of volumes.
Transactional Updates comes from Leap 15 & Tumbleweed, so it was provied by OpenSuse. Try to install a package: transactional-update pkg in wget. Need to reboot machine after installation finished. transactional-update rollback last will rollback to latest snapshot.
So why not use Fedora Atomic/CoreOS? Because it didn’t provided Terraform script to build k8s with KVM. http://www.projectatomic.io/docs/gettingstarted/ Here use virt-manager to deploy k8s with atomic. But It builds vm manually. This Libvirt Provider for Terraform supports CoresOS and PCI passthrough. Cool!
https://github.com/kubernetes-sigs/kubespray all-in-one solution. Support lots of linux distribution and different k8s component. Kubic just provide a container linux and still need extra works to build a HA cluster. Kubespray will install k8s cluster automatically, just like Magnum.
If Kubic supports upgrading of OS, how about the pods which have been installed on it? Need provision again? For common cloud image like Fedora Cloud image, the pain point is it takes long time to do release upgrade and soon a release reaches EOL.
add Terraform KVM provider SR-IOV support
Error creating libvirt domain: virError(Code=1, Domain=10, Message=’internal error: process exited while connecting to monitor: 2019-02-12T10:20:45.293085Z qemu-system-x86_64: -drive file=/home/fan/go/src/github.com/dmacvicar/terraform-provider-libvirt/libvirt/testdata/tcl.iso,format=raw,if=none,id=drive-ide0-0-0,readonly=on: Could not open ‘/home/fan/go/src/github.com/dmacvicar/terraform-provider-libvirt/libvirt/testdata/tcl.iso’: Permission denied’) —> lots of this issue. I just copy the file to /var/lib/libvirt/images.
Error clearing libvirt network: virError(Code=1, Domain=0, Message=’internal error: Network is already in use by interface virbr1’) —> sudo ip link set virbr1 down
Add passthrough = “enp6s0”, then get error “testing.go:538: Step 0 error: After applying this step, the plan was not empty”
—> https://www.terraform.io/docs/extend/best-practices/testing.html#expecting-errors-or-non-empty-plans add ExpectNonEmptyPlan: true. But why? But this will result in that the code will not get passthrough attribute. The above link say “It is possible for scenarios to exist where a valid configuration (no errors during plan) would result in a non-empty plan”, so I changed tf script to add another interface without ‘network_name’:
network_interface = {
    network_name = "default"
}
network_interface {
    passthrough = "enp6s0"
}
Then work well.
"hostdev = "${var.hostdev_list[count.index]}" It ref an array. If count > array length, an error “libvirt_domain.kubic-domain[5]: index 5 out of range for list var.hostdev_list (max 3) in” before run script. A static check. Good since until now no resource created so not need to rollback.
But then I found the interfac-hostdev is wrong. Shoud directly use hostdev as vendor/github.com/libvirt/libvirt-go-xml/domain_test.go DomainHostdevSubsysPCI does, since hostdev would any device beside network interface. If terraform encounter error like “could not access /sys/bus/pci/devices/0000:01:0a.0/config: No such file or directory” when do ‘terraform apply’, the vm will still be created. But looks vm state will not be saved and result in that the vm will not be deleted when do ‘terraform destroy’.
The code of master branch has issue: the created vm’s disk size is 0 and vm can’t boot. Change to v0.5.1. OK. But make testacc TEST_ARGS="-run TestAccLibvirtDomain_Hostdev" will test all testcase. WTF.
Now pci passthrough works well. But old way to get ip will not work. Anyway I can use hostname to access vm.
terraform is good if we can finish task by existing task and I can accept the strange syntax and less flexibility. If I have to write my plugin by Golang, not good.
git push fan pci-passthough:pci-passthough. This command will: 1) submit to my remote branch; 2) create PR to original branch.
Code is here https://github.com/fkpwolf/terraform-provider-libvirt. Now the original repo has supported this feature.
Ansible to bring up HA
tf 是声明式的,需要大量的plugin,似乎 KubeSpray 这种更简单,但是 kubespray 不创建节点,所以结合使用 Terraform 更好。
Ok. Now switch above kubic image to common os image since kubic has too much package like kubelet which would be conflict with kubespray. Reuse kubic-kvm and just change os image, failed. Ubuntu can’t boot. Turn into Fedora-Cloud-Base-28-1.1.x86_64.qcow2 since Fedora will automatically bring up NIC even it is SR-IOV. Boot ok and can get dhcp ip. But hostname not work. Same as Cenots-7. Use command ‘hostnamectl set-hostname ${hostname}’ as here in commoninit.cfg still not work. hostname changed in hostnamectl but DHCP name still localhost.
Try Centos. It can get IP by dhcp but no hostname. But if reboot, ip lost because nic MAC changed. This NIC 82576 SR-IOV will change mac randomly? But If I use kubic, everything works well and MAC didn’t changed. Really strange. I should give up kubespray and just use Ansible maybe.
Here is an Ansible hello world https://codingbee.net/tutorials/ansible/ansible-a-hello-world-playbook. Or Chinese here https://ansible-tran.readthedocs.io/en/latest/docs/intro_getting_started.html By default, it read /etc/ansible/hosts as hostname. Not good. I used a ‘–inventory file’ as parameter. More details on HA k8s Ansible, ref https://github.com/lingxiankong/kubernetes-study/tree/master/installation/ansible/version_4 & https://lingxiankong.github.io/2018-06-22-multi-master-k8s.html For a newbie like me, there is so many small try like “copy” and “retry” task. I have create a new test.yaml for this purpose. If I test in whole big task it will take long time since kubeadm init will take lots of time. Another way on How to run only one task in ansible playbook?.
- name: Wait for APIs to become available.
  command: kubectl get --raw /apis/autoscaling/v1
  register: autoscalingv1
  until: autoscalingv1.failed != True and (autoscalingv1.stdout | from_json).apiVersion == "v1"
  retries: 60
  delay: 5
The until and retries are really useful for common task. Looks Terraform has no these kinds of feature?
To clear etcd, I have installed etcd package using brew in Mac OS and run script locally. Terraform has etcd plugin and better support for CNCF. Error: “Failed to connect to the host via ssh: WARNING: REMOTE HOST IDENTIFICATION HAS CHANGED!” It need to change local(Mac OS) ssh config. So Ansible used local OS command like ssh so it has dependency on external env. Not good.
Code is here https://github.com/fkpwolf/kubic-kvm & https://github.com/fkpwolf/kubic-ansible.